Shortcuts tool for efficient work Download free version at
command-prompt-shortcut-keys We look at some useful keyboard shortcuts and commands that will help you personalize the MS-DOS Command Prompt Window without using the mouse.
You will also learn about hotkeys for executing DOS commands more quickly. The keyboard shortcuts are known to work in Windows Vista and XP command prompt.
. Change the color scheme of the DOS Window
dos color shortcutcolor bf - where b is the background color while f is for the foreground color (they are hex codes).
For instance, if you want to have a white background with black text, type color F0 and press enter. To revert to the original color scheme, type color without any arguments.
For a list of all available colors, type color /? on the command line.
2. Chant the Title of the Window to reflect the current time
dos-title-command
Do you know that you can put your name or your blog address in the title of the command prompt window. That's like a neat watermark when you are using that screenshot for your website.
title your_name %time%
That %time% will append the current timestamp to the Window's title.
3. Navigate the Command History using Keyboard
If you have a long list of commands in the history, press the function key F7 to navigate through the history list using the arrow keys.
And if you already know the command number, press F9 and directly type that number. Very useful if you have to run some command repeatedly.
4. Typing Long Commands at the DOS Prompt
You know the frustration when you type some long command only to realize that you made a typo or omitted typing some character. Either type the whole command again or a better option is the F1 key.
f2-dos-command F1 prints characters of the previous command one by one.
Alternatively, you can press F2 to copy a certain number of characters from the previous command to the current one. Let me illustrate that with an example:
Say I want to run the command "nslookup www.google.com" but wrote "nslookup www.googlx.com" in a hurry.
Instead of retyping the whole thing, I can say F2 and then say x. This will print all the characters upto "x". Then you can press F3 to complete the command or type it manually.


Showing posts with label All Tutorial Windows. Show all posts
Showing posts with label All Tutorial Windows. Show all posts
Wednesday, April 13, 2011


Using ATTRIB
ATTRIB
Type: External (3.0 and later)
Syntax:
ATTRIB [d:][path]filename [/S]
ATTRIB [+ R|-R] [+A|-A] [+ H|-H] [+ S|-S] [d:][path]filename [/S]
Purpose:
Sets or displays the read-only, archive, system, and hidden attributes of a file or directory.
Discussion
Using the ATTRIB command, you can change a file`s read/write attribute or set the archive attribute. If you use this command to specify a file as read-only, the file can be accessed, but not altered or deleted.
If a file has an attribute of -R, it can be both read from or written to (it is referred to as read/write). If a file has an attribute of +R, it can be read from, but not written to (for example, you can use your word processor to look at it but not to alter it).
NOTE:
If you try to erase a file after you have set its attribute to read-only (+R), DOS will display the words ACCESS DENIED. Before you can erase the file you must use the ATTRIB command to change the file`s attribute to read/write (-R).
The BACKUP, RESTORE, and XCOPY commands can use the archive attribute. You can use the +A or -A options to selectively back up using the BACKUP command. You can also use these options to selectively copy using the XCOPY command.
Wildcard characters (? and *) can be used. However, you CANNOT use a directory name instead of a filename to change the attributes of all files in a directory.
With DOS Version 5 and later you can hide data files by applying the +H (hidden) attribute. -H removes the hidden attribute. The +S (system) and -S options are generally used by programmers to hide and unhide command files used only by DOS. After applying the hidden or system attribute to a file, it will not appear in a directory listing unless you specifically request it with the /A parameter of the DIRECTORY command.
Options
+R - Use the +R option to make a file read-only. Read-only files may be read but they can`t be changed or deleted.
-R - Use the -R option to change the file protection attribute back to normal (so it can be read, changed, or deleted).
+A - Use the +A option to set the ARCHIVE attribute of a file. When the +A option is used, this flags the file as available for archiving when using the BACKUP or XCOPY commands.
-A - Use the -A option to turn off the ARCHIVE attribute.
+H - With DOS Versions 4 through 6, use the +H option to set the HIDDEN attribute of a file so that it will not appear in a directory listing.
-H - Use the -H option to turn off the HIDDEN attribute.
+S - With DOS Versions after Version 4, use the +S option to set the SYSTEM attribute of a file. When the +S option is used, this flags the file as a command file used only by DOS. The file will not appear in a directory listing. This attribute is generally reserved for programmers.
-S - Use the -S option to turn off the SYSTEM attribute.
/S - Use the /S switch to set attributes on subdirectories found within the specified path.
Examples
The following form of the command sets the read-only attribute for the file SALES87.TXT:
attrib +r a:sales87.txt
After you have set the read-only attribute for the file SALES87.TXT, DOS will not allow you to delete or modify it (until the attribute is removed).
To set the archive attribute for the file LETTER3.DOC which is in the \LETTERS directory on drive B, enter
attrib +a b:\letters\letter3.doc
After the archive bit has been set, commands such as XCOPY can selectively act on them (using the BACKUP or XCOPY /M switch). For more information, refer to the BACKUP and XCOPY command sections.
To determine the current attribute settings for all of the files in the current directory, enter
attrib *.*
The attribute settings for all of the files on the current directory will be displayed. If, for example, you were working in the \LETTERS directory on the diskette in drive B, ATTRIB would display something like this:
A B:\LETTERS\LETTER3.TXT
A R B:\LETTERS\SALES87.DOC
B:\LETTERS\SALES-N.TXT
This display indicates that three files were found and that the first two had the archive bit set. The second file is also marked as read-only.
Type: External (3.0 and later)
Syntax:
ATTRIB [d:][path]filename [/S]
ATTRIB [+ R|-R] [+A|-A] [+ H|-H] [+ S|-S] [d:][path]filename [/S]
Purpose:
Sets or displays the read-only, archive, system, and hidden attributes of a file or directory.
Discussion
Using the ATTRIB command, you can change a file`s read/write attribute or set the archive attribute. If you use this command to specify a file as read-only, the file can be accessed, but not altered or deleted.
If a file has an attribute of -R, it can be both read from or written to (it is referred to as read/write). If a file has an attribute of +R, it can be read from, but not written to (for example, you can use your word processor to look at it but not to alter it).
NOTE:
If you try to erase a file after you have set its attribute to read-only (+R), DOS will display the words ACCESS DENIED. Before you can erase the file you must use the ATTRIB command to change the file`s attribute to read/write (-R).
The BACKUP, RESTORE, and XCOPY commands can use the archive attribute. You can use the +A or -A options to selectively back up using the BACKUP command. You can also use these options to selectively copy using the XCOPY command.
Wildcard characters (? and *) can be used. However, you CANNOT use a directory name instead of a filename to change the attributes of all files in a directory.
With DOS Version 5 and later you can hide data files by applying the +H (hidden) attribute. -H removes the hidden attribute. The +S (system) and -S options are generally used by programmers to hide and unhide command files used only by DOS. After applying the hidden or system attribute to a file, it will not appear in a directory listing unless you specifically request it with the /A parameter of the DIRECTORY command.
Options
+R - Use the +R option to make a file read-only. Read-only files may be read but they can`t be changed or deleted.
-R - Use the -R option to change the file protection attribute back to normal (so it can be read, changed, or deleted).
+A - Use the +A option to set the ARCHIVE attribute of a file. When the +A option is used, this flags the file as available for archiving when using the BACKUP or XCOPY commands.
-A - Use the -A option to turn off the ARCHIVE attribute.
+H - With DOS Versions 4 through 6, use the +H option to set the HIDDEN attribute of a file so that it will not appear in a directory listing.
-H - Use the -H option to turn off the HIDDEN attribute.
+S - With DOS Versions after Version 4, use the +S option to set the SYSTEM attribute of a file. When the +S option is used, this flags the file as a command file used only by DOS. The file will not appear in a directory listing. This attribute is generally reserved for programmers.
-S - Use the -S option to turn off the SYSTEM attribute.
/S - Use the /S switch to set attributes on subdirectories found within the specified path.
Examples
The following form of the command sets the read-only attribute for the file SALES87.TXT:
attrib +r a:sales87.txt
After you have set the read-only attribute for the file SALES87.TXT, DOS will not allow you to delete or modify it (until the attribute is removed).
To set the archive attribute for the file LETTER3.DOC which is in the \LETTERS directory on drive B, enter
attrib +a b:\letters\letter3.doc
After the archive bit has been set, commands such as XCOPY can selectively act on them (using the BACKUP or XCOPY /M switch). For more information, refer to the BACKUP and XCOPY command sections.
To determine the current attribute settings for all of the files in the current directory, enter
attrib *.*
The attribute settings for all of the files on the current directory will be displayed. If, for example, you were working in the \LETTERS directory on the diskette in drive B, ATTRIB would display something like this:
A B:\LETTERS\LETTER3.TXT
A R B:\LETTERS\SALES87.DOC
B:\LETTERS\SALES-N.TXT
This display indicates that three files were found and that the first two had the archive bit set. The second file is also marked as read-only.
Using command prompt "attrib" to check for Viruses or Malware
Microsoft Command Prompt "attrib" is a very useful tool to check if your hard drives even your flashdisks have been infected by a virus.
You will know if a Malware is inside your hard drive just by looking at the attributes of each files and the file that has the attributes of +s +h +r
The function of attrib is to set and remove file attributes (read-only, archive, system and hidden).
Launch attrib
To start attrib
1. Go to Start Menu > Run
2. Type cmd (cmd stands for command prompt)
3. Press Enter key
The Command Prompt will appear showing us where is our location in the directory.

Using attrib
To use attrib :
1. Go to the root directory first by typing cd\(because this is always the target of Malware / Virus)
2. Type attrib and press Enter key

n this example, I have two files that are considered as malware.
Note that there are two files which I outlined in red (SilentSoftech.exe and autorun.inf). Since you cannot see this file nor delete it (because the attributes that was set on these files are +s +h +r)
1. +s - meaning it is a system file (which also means that you cannot delete it just by using the delete command)
2. +h - means it is hidden (so you cannot delete it)
3. +r - means it is a read only file ( which also means that you cannot delete it just by using the delete command)
Now we need to set the attributes of autorun.inf to -s -h -r (so that we can manually delete it)
1. Type attrib -s -h -r autorun.inf ( be sure to include -s -h -r because you cannot change the attributes using only -s or -h or -r alone)
2. Type attrib again to check if your changes have been commited
3. If the autorun.inf file has no more attributes, you can now delete it by typing del autorun.inf
4. Since SilentSoftech.exe is a malware you can remove its attributes by doing step 1 and step 3(just change the filename) ex. attrib -s -h -r silentsoftech.exe

There you have it!!!!
NOTE : when autorun.inf keeps coming back even if you already deleted it, be sure to check your Task Manager by pressing CTRL + ALT + DELETE ( a virus is still running as a process thats why you cannot delete it. KILL the process first by selecting it and clicking End Process.
NOTE: You can also apply the attrib -s -h -r command to all the partition of your computer, drive D: drive E: drive F: (all of your drives). For example. for drive D, just type "D:" (minus the double quote) then you can see that your current drive is D.. type there the command "attrib -s -h -r *.exe" for exe files and "attrib -s -h -r *.inf" and then delete the file by "del autorun.inf".
You will know if a Malware is inside your hard drive just by looking at the attributes of each files and the file that has the attributes of +s +h +r
The function of attrib is to set and remove file attributes (read-only, archive, system and hidden).
Launch attrib
To start attrib
1. Go to Start Menu > Run
2. Type cmd (cmd stands for command prompt)
3. Press Enter key
The Command Prompt will appear showing us where is our location in the directory.

Using attrib
To use attrib :
1. Go to the root directory first by typing cd\(because this is always the target of Malware / Virus)
2. Type attrib and press Enter key

n this example, I have two files that are considered as malware.
Note that there are two files which I outlined in red (SilentSoftech.exe and autorun.inf). Since you cannot see this file nor delete it (because the attributes that was set on these files are +s +h +r)
1. +s - meaning it is a system file (which also means that you cannot delete it just by using the delete command)
2. +h - means it is hidden (so you cannot delete it)
3. +r - means it is a read only file ( which also means that you cannot delete it just by using the delete command)
Now we need to set the attributes of autorun.inf to -s -h -r (so that we can manually delete it)
1. Type attrib -s -h -r autorun.inf ( be sure to include -s -h -r because you cannot change the attributes using only -s or -h or -r alone)
2. Type attrib again to check if your changes have been commited
3. If the autorun.inf file has no more attributes, you can now delete it by typing del autorun.inf
4. Since SilentSoftech.exe is a malware you can remove its attributes by doing step 1 and step 3(just change the filename) ex. attrib -s -h -r silentsoftech.exe

There you have it!!!!
NOTE : when autorun.inf keeps coming back even if you already deleted it, be sure to check your Task Manager by pressing CTRL + ALT + DELETE ( a virus is still running as a process thats why you cannot delete it. KILL the process first by selecting it and clicking End Process.
NOTE: You can also apply the attrib -s -h -r command to all the partition of your computer, drive D: drive E: drive F: (all of your drives). For example. for drive D, just type "D:" (minus the double quote) then you can see that your current drive is D.. type there the command "attrib -s -h -r *.exe" for exe files and "attrib -s -h -r *.inf" and then delete the file by "del autorun.inf".
Using Command Promt
Microsoft DOS format command
About format
Format is used to erase information off of a computer diskette or fixed drive.
Tip Although the information appears to be erased it is still possible for software recovery programs to recover information from a formatted drive. If you want to make sure no information can be recovered from the drive use a software utility to make sure all data is erased.
Availability:
The format.com command is an external command that is available in the below Microsoft operating systems.
All Versions of MS-DOS
Windows 95
Windows 98
Windows ME
Windows NT
Windows 2000
Windows XP
Windows Vista
Windows 7
Syntax :
Microsoft Windows 95, 98, ME syntax
Formats a disk for use with MS-DOS.
FORMAT drive: [/V[:label]] [/Q] [/F:size] [/B | /S] [/C]
FORMAT drive: [/V[:label]] [/Q] [/T:tracks /N:sectors] [/B | /S] [/C]
FORMAT drive: [/V[:label]] [/Q] [/1] [/4] [/B | /S] [/C]
FORMAT drive: [/Q] [/1] [/4] [/8] [/B | /S] [/C]
/V[:label] : Specifies the volume label.
/Q : Performs a quick format.
/F: : size Specifies the size of the floppy disk to format (such as 160, 180, 320, 360, 720, 1.2, 1.44, 2.88).
/B : Allocates space on the formatted disk for system files.
/S : Copies system files to the formatted disk.
/T:tracks : Specifies the number of tracks per disk side.
/N:sectors : Specifies the number of sectors per track.
/1 : Formats a single side of a floppy disk.
/4 : Formats a 5.25-inch 360K floppy disk in a high-density drive.
/8 : Formats eight sectors per track.
/C : Tests clusters that are currently marked "bad."
Microsoft Windows 2000 and Windows XP syntax :
Formats a disk for use with Windows 2000
FORMAT volume [/FS:file-system] [/V:label] [/Q] [/A:size] [/C] [/X]
FORMAT volume [/V:label] [/Q] [/F:size]
FORMAT volume [/V:label] [/Q] [/T:tracks /N:sectors]
FORMAT volume [/V:label] [/Q] [/1] [/4]
FORMAT volume [/Q] [/1] [/4] [/8]
volume Specifies the drive letter (followed by a colon), mount point, or volume name :
/FS:filesystem :Specifies the the file system (FAT, FAT32, or NTFS).
/V:label :Specifies the volume label.
/Q :Performs a quick format.
/C :Files created on the new volume will be compressed by default.
/X :Forces the volume to dismount first if necessary. All opened handles to the volume would no longer be valid.
/A: :size Overrides the default allocation unit size. Default settings are strongly recommended for general use.
NTFS supports 512, 1024, 2048, 4096, 8192, 16K, 32K, 64K.
FAT supports 512, 1024, 2048, 4096, 8192, 16K, 32K, 64K, (128K, 256K for sector size > 512 bytes).
FAT32 supports 512, 1024, 2048, 4096, 8192, 16K, 32K, 64K, (128K, 256K for sector size > 512 bytes).
Note that the FAT and FAT32 files systems impose the below restrictions on the number of clusters on a volume:
FAT: Number of clusters <= 65526 FAT32: 65526 < Number of clusters < 268435446
Format will immediately stop processing if it decides that the above requirements cannot be met using the specified cluster size.
NTFS compression is not supported for allocation unit sizes above 4096.
/F : size Specifies the size of the floppy disk to format (160,
180, 320, 360, 640, 720, 1.2, 1.23, 1.44, 2.88, or 20.8).
/T:tracks : Specifies the number of tracks per disk side.
/N:sectors : Specifies the number of sectors per track.
/1 : Formats a single side of a floppy disk.
/4 : Formats a 5.25-inch 360K floppy disk in a high-density drive.
/8 : Formats eight sectors per track.
Microsoft Windows 2000 and Windows XP recovery console syntax
Formats a disk for use with Windows 2000.
format [drive:] [/q] [/fs:file-system]
drive: Specifies the drive to format.
/q Performs a quick format.
/fs:file-system Specifies the file system to use (FAT, FAT32, or NTFS)
Examples :
When using the format command, remember all information on the drive you wish to format will be completely erased.
format a:
Would erase all the contents off a disk. Commonly used on a diskette that has not been formatted or on a diskette you wish to erase.
format a: /q
Quickly erases all the contents of a floppy diskette. Commonly used to quickly erase all information on the diskette.
format c:
This would erase the contents of your C: hard disk drive. In other words, unless you wish to erase all your computer's information, this command should not be done unless you're planning to start over.
About format
Format is used to erase information off of a computer diskette or fixed drive.
Tip Although the information appears to be erased it is still possible for software recovery programs to recover information from a formatted drive. If you want to make sure no information can be recovered from the drive use a software utility to make sure all data is erased.
Availability:
The format.com command is an external command that is available in the below Microsoft operating systems.
All Versions of MS-DOS
Windows 95
Windows 98
Windows ME
Windows NT
Windows 2000
Windows XP
Windows Vista
Windows 7
Syntax :
Microsoft Windows 95, 98, ME syntax
Formats a disk for use with MS-DOS.
FORMAT drive: [/V[:label]] [/Q] [/F:size] [/B | /S] [/C]
FORMAT drive: [/V[:label]] [/Q] [/T:tracks /N:sectors] [/B | /S] [/C]
FORMAT drive: [/V[:label]] [/Q] [/1] [/4] [/B | /S] [/C]
FORMAT drive: [/Q] [/1] [/4] [/8] [/B | /S] [/C]
/V[:label] : Specifies the volume label.
/Q : Performs a quick format.
/F: : size Specifies the size of the floppy disk to format (such as 160, 180, 320, 360, 720, 1.2, 1.44, 2.88).
/B : Allocates space on the formatted disk for system files.
/S : Copies system files to the formatted disk.
/T:tracks : Specifies the number of tracks per disk side.
/N:sectors : Specifies the number of sectors per track.
/1 : Formats a single side of a floppy disk.
/4 : Formats a 5.25-inch 360K floppy disk in a high-density drive.
/8 : Formats eight sectors per track.
/C : Tests clusters that are currently marked "bad."
Microsoft Windows 2000 and Windows XP syntax :
Formats a disk for use with Windows 2000
FORMAT volume [/FS:file-system] [/V:label] [/Q] [/A:size] [/C] [/X]
FORMAT volume [/V:label] [/Q] [/F:size]
FORMAT volume [/V:label] [/Q] [/T:tracks /N:sectors]
FORMAT volume [/V:label] [/Q] [/1] [/4]
FORMAT volume [/Q] [/1] [/4] [/8]
volume Specifies the drive letter (followed by a colon), mount point, or volume name :
/FS:filesystem :Specifies the the file system (FAT, FAT32, or NTFS).
/V:label :Specifies the volume label.
/Q :Performs a quick format.
/C :Files created on the new volume will be compressed by default.
/X :Forces the volume to dismount first if necessary. All opened handles to the volume would no longer be valid.
/A: :size Overrides the default allocation unit size. Default settings are strongly recommended for general use.
NTFS supports 512, 1024, 2048, 4096, 8192, 16K, 32K, 64K.
FAT supports 512, 1024, 2048, 4096, 8192, 16K, 32K, 64K, (128K, 256K for sector size > 512 bytes).
FAT32 supports 512, 1024, 2048, 4096, 8192, 16K, 32K, 64K, (128K, 256K for sector size > 512 bytes).
Note that the FAT and FAT32 files systems impose the below restrictions on the number of clusters on a volume:
FAT: Number of clusters <= 65526 FAT32: 65526 < Number of clusters < 268435446
Format will immediately stop processing if it decides that the above requirements cannot be met using the specified cluster size.
NTFS compression is not supported for allocation unit sizes above 4096.
/F : size Specifies the size of the floppy disk to format (160,
180, 320, 360, 640, 720, 1.2, 1.23, 1.44, 2.88, or 20.8).
/T:tracks : Specifies the number of tracks per disk side.
/N:sectors : Specifies the number of sectors per track.
/1 : Formats a single side of a floppy disk.
/4 : Formats a 5.25-inch 360K floppy disk in a high-density drive.
/8 : Formats eight sectors per track.
Microsoft Windows 2000 and Windows XP recovery console syntax
Formats a disk for use with Windows 2000.
format [drive:] [/q] [/fs:file-system]
drive: Specifies the drive to format.
/q Performs a quick format.
/fs:file-system Specifies the file system to use (FAT, FAT32, or NTFS)
Examples :
When using the format command, remember all information on the drive you wish to format will be completely erased.
format a:
Would erase all the contents off a disk. Commonly used on a diskette that has not been formatted or on a diskette you wish to erase.
format a: /q
Quickly erases all the contents of a floppy diskette. Commonly used to quickly erase all information on the diskette.
format c:
This would erase the contents of your C: hard disk drive. In other words, unless you wish to erase all your computer's information, this command should not be done unless you're planning to start over.
Monday, April 11, 2011
Install Windows Server 2003
Install Windows Server 2003
When you run the Windows Server 2003 Setup program, you must provide information about how to install and configure the operating system. Thorough planning can make your installation of Windows Server 2003 more efficient by helping you to avoid potential problems during installation. An understanding of the configuration options will also help to ensure that you have properly configured your system.
I won't go into that part right now (I might later this month, no promises...) but here are some of the most important things you should take into consideration when planning for your Windows Server 2003 installation:
* Check System Requirements
* Check Hardware and Software Compatibility
* Determine Disk Partitioning Options
* Choose the Appropriate File System: FAT, FAT32, NTFS
* Decide on a Workgroup or Domain Installation
* Complete a Pre-Installation Checklist
After you made sure you can go on, start the installation process.
Step 2: Beginning the installation process
You can install Windows Server 2003 in several methods - all are valid and good, it all depends upon your needs and your limitations.
For example, you can install directly from a CD by booting your computer with the CD, or you can also copy the I386 folder from a CD and run the setup process by going into the I386 folder and using the WINNT or WINNT32 command (depending upon your existing operating system).
It doesn't matter how you run the setup process, but the moment it runs - all setup methods look alike.
Step #3: The text-based portion of the Setup program
The setup process begins loading a blue-looking text screen (not GUI). In that phase you will be asked to accept the EULA and choose a partition on which to install 2003, and if that partition is new, you'll be asked to format it by using either FAT, FAT32 or NTFS.
1. Start the computer from the CD.

2. You can press F6 if you need to install additional SCSI adapters or other mass-storage devices. If you do you will be asked to supply a floppy disk with the drivers and you CANNOT browse it (or a CD for that matter). Make sure you have one handy.

3. If you want, you can press F2 to run the ASR sequence. For that you need a good backup created by the Windows Server 2003 backup program, and the ASR floppy disk. If you plan to install a new copy of 2003 - don't do anything.

4. Setup will load all the needed files and drivers.

5. Select To Setup Windows Server 2003 Now. If you want, and if you have a previous installation of the OS, you can try to fix it by pressing R. If not, just press ENTER.

6. Read and accept the licensing agreement and press F8 if you accept it.

7. 1. Select or create the partition on which you will install Windows Server 2003. Depending upon your existing disk configuration choose one of the following:
* If the hard disk is unpartitioned, you can create and size the partition on which you will install Windows Server 2003.


* If the hard disk is already partitioned, but has enough unpartitioned disk space, you can create an additional partition in the unpartitioned space.
* If the hard disk already has a partition that is large enough, you can install Windows Server 2003 on that partition. If the partition has an existing operating system, you will overwrite that operating system if you accept the default installation path. However, files other than the operating system files, such as program files and data files, will not be overwritten.
* If the hard disk has an existing partition, you can delete it to create more unpartitioned space for the new partition. Deleting an existing partition erases all data on that partition.
If you select a new partition during Setup, create and size only the partition on which you will install Windows Server 2003. After installation, use Disk Management to partition the remaining space on the hard disk.
1. Select a file system for the installation partition. After you create the partition on which you will install Windows Server 2003, you can use Setup to select the file system with which to format the partition. Windows Server 2003 supports the NTFS file system in addition to the file allocation table (FAT) and FAT32 file systems. Windows Server 2003, Windows XP Professional, Windows 2000, and Windows NT are the only Microsoft operating systems that you can use to gain access to data on a local hard disk that is formatted with NTFS. If you plan to gain access to files that are on a local Windows Server 2003 partition with the Microsoft Windows 95 or Windows 98 operating systems, you should format the partition with a FAT or FAT32 file system. We will use NTFS.


2. Setup will then begin copying necessary files from the installation point (CD, local I386 or network share).
3. Note: If you began the installation process from an MS-DOS floppy, make sure you have and run SMARTDRV from the floppy, otherwise the copying process will probably last more than an hour, perhaps even more. With SMARTDRV (or if setup was run by booting from CD) the copying will probably last a few minutes, no more than 5 max.


3. The computer will restart in graphical mode, and the installation will continue.

Next Step : The GUI-based portion of the Setup program
The setup process reboots and loads a GUI mode phase.


It will then begin to load device drivers based upon what it finds on your computer. You don't need to do anything at this stage.

1. Click Customize to change regional settings, if necessary.
* Current System Locale - Affects how programs display dates, times, currency, and numbers. Choose the locale that matches your location, for example, French (Canada).
* Current Keyboard Layout - Accommodates the special characters and symbols used in different languages. Your keyboard layout determines which characters appear when you press keys on the keyboard.
If you don't need to make any changes just press Next.

If you do need to make changes press Customize and add your System Locale etc.
Note for Hebrew users: Unlike W2K, it is SAFE and it is OK for you to install Hebrew language support at this phase.
To install Hebrew support:
After pressing Customize go to the Languages tab and select the "Install files for complex script and right-to-left languages".
A warning message will appear. Press Ok.


Warning: You must now press Apply!!!
Setup will copy the necessary files from the installation point.
You can now go to the Regional Options tab and select Israel in the Location drop-down list, and Hebrew in the Standards and Formats drop-down list. Click Ok.

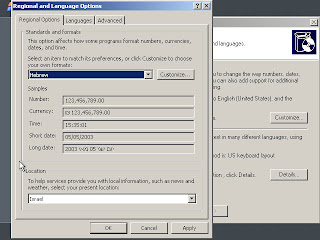

Note: Read the Install Hebrew on Windows Server 2003 page for more info.
1. Type your name and organization.

2. Type the product key.

3. Enter the appropriate license type and number of purchased licenses.

4. Type the computer name and a password for the local Administrator account. The local Administrator account resides in the SAM of the computer, not in Active Directory. If you will be installing in a domain, you need either a pre-assigned computer name for which a domain account has been created, or the right to create a computer account within the domain.

5. If you enter a password that is blank or does not match the required complexity settings you will get a warning message.

6. Select the date, time, and time zone settings.

7. Setup will now install the networking components.


After a few seconds you will receive the Networking Settings window. BTW, if you have a NIC that is not in the HCL (see the What's the HCL? page) and Windows Server 2003 cannot detect it, or if you don't have a NIC at all, setup will skip this step and you will immediately go to the final phase of the setup process.
Press Next to accept the Typical settings option if you have one of the following situations:
* You have a functional DHCP on your network.
* You have a computer running Internet Connection Sharing (ICS).
* You're in a workgroup environment and do not plan to have any other servers or Active Directory at all, and all other workgroup members are configured in the same manner.
Otherwise select Custom Settings and press Next to customize your network settings.

Highlight the TCP/IP selection and press Properties.

In the General tab enter the required information. You must specify the IP address of the computer, and if you don't know what the Subnet Mask entry should be - you can simply place your mouse pointer over the empty area in the Subnet Mask box and click it. The OS will automatically select the value it thinks is good for the IP address you provided.

If you don't know what these values mean, or if you don't know what to write in them, press cancel and select the Typical Settings option. You can easily change these values later.
1. In the Workgroup or Domain window enter the name of your workgroup or domain.
* A workgroup is a small group of computers on a network that enables users to work together and does not support centralized administration.
* A domain is a logical grouping of computers on a network that has a central security database for storing security information. Centralized security and administration are important for computers in a domain because they enable an administrator to easily manage computers that are geographically distant from each other. A domain is administered as a unit with common rules and procedures. Each domain has a unique name, and each computer within a domain has a unique name.
If you're a stand-alone computer, or if you don't know what to enter, or if you don't have the sufficient rights to join a domain - leave the default entry selected and press Next.

If you want to join a domain (NT 4.0 domain of W2K/2003 Active Directory domain) enter the domain's name in the "Yes, make this computer a member of the following domain" box.

To successfully join a domain you need the following:
* The person performing the installation must have a user account in Active Directory. This account does not need to be the domain Administrator account.
and
* The computer must have an existing computer account in the Active Directory database of the domain that the computer is joining, and the computer must be named exactly as its domain account is named.
or
* The person performing the installation must have appropriate permission to create a domain account for the computer during installation.
Also, you need to have connectivity to the domain's domain controllers (only to the PDC if on an NT 4.0 domain) and a fully functional DNS server (only in AD domains). Read the Joining a Domain in Windows XP Pro and Requirements when Joining a Domain pages for more on this issue.
Enter the Active Directory domain name (in the form of xxx.yyy, for example: DPETRI.NET) or the NetBIOS name of the NT 4.0 domain (in the form of xxx, for example: DPETRI). Press Next.
Note: If you provide a wrong domain name or do not have the correct connectivity to the domain's DNS server you will get an error message.
A username/password window will appear. Enter the name and password of the domain's administrator (or your own if you're the administrator on the target domain).

Note: Providing a wrong username or password will cause this phase to fail.
1. Next the setup process will finish copying files and configuring the setup. You do not need to do anything.


2. After the copying and configuring phase is finished, if Windows Server 2003 finds that you have a badly configured screen resolution it will advise you to change it and ask you if you see the new settings right.
BTW, the minimum supported screen resolution in 2003 is 800X600.
3. Setup finishes and boots Windows Server 2003.


4. That's it! you're done!

When you run the Windows Server 2003 Setup program, you must provide information about how to install and configure the operating system. Thorough planning can make your installation of Windows Server 2003 more efficient by helping you to avoid potential problems during installation. An understanding of the configuration options will also help to ensure that you have properly configured your system.
I won't go into that part right now (I might later this month, no promises...) but here are some of the most important things you should take into consideration when planning for your Windows Server 2003 installation:
* Check System Requirements
* Check Hardware and Software Compatibility
* Determine Disk Partitioning Options
* Choose the Appropriate File System: FAT, FAT32, NTFS
* Decide on a Workgroup or Domain Installation
* Complete a Pre-Installation Checklist
After you made sure you can go on, start the installation process.
Step 2: Beginning the installation process
You can install Windows Server 2003 in several methods - all are valid and good, it all depends upon your needs and your limitations.
For example, you can install directly from a CD by booting your computer with the CD, or you can also copy the I386 folder from a CD and run the setup process by going into the I386 folder and using the WINNT or WINNT32 command (depending upon your existing operating system).
It doesn't matter how you run the setup process, but the moment it runs - all setup methods look alike.
Step #3: The text-based portion of the Setup program
The setup process begins loading a blue-looking text screen (not GUI). In that phase you will be asked to accept the EULA and choose a partition on which to install 2003, and if that partition is new, you'll be asked to format it by using either FAT, FAT32 or NTFS.
1. Start the computer from the CD.

2. You can press F6 if you need to install additional SCSI adapters or other mass-storage devices. If you do you will be asked to supply a floppy disk with the drivers and you CANNOT browse it (or a CD for that matter). Make sure you have one handy.

3. If you want, you can press F2 to run the ASR sequence. For that you need a good backup created by the Windows Server 2003 backup program, and the ASR floppy disk. If you plan to install a new copy of 2003 - don't do anything.

4. Setup will load all the needed files and drivers.

5. Select To Setup Windows Server 2003 Now. If you want, and if you have a previous installation of the OS, you can try to fix it by pressing R. If not, just press ENTER.

6. Read and accept the licensing agreement and press F8 if you accept it.

7. 1. Select or create the partition on which you will install Windows Server 2003. Depending upon your existing disk configuration choose one of the following:
* If the hard disk is unpartitioned, you can create and size the partition on which you will install Windows Server 2003.


* If the hard disk is already partitioned, but has enough unpartitioned disk space, you can create an additional partition in the unpartitioned space.
* If the hard disk already has a partition that is large enough, you can install Windows Server 2003 on that partition. If the partition has an existing operating system, you will overwrite that operating system if you accept the default installation path. However, files other than the operating system files, such as program files and data files, will not be overwritten.
* If the hard disk has an existing partition, you can delete it to create more unpartitioned space for the new partition. Deleting an existing partition erases all data on that partition.
If you select a new partition during Setup, create and size only the partition on which you will install Windows Server 2003. After installation, use Disk Management to partition the remaining space on the hard disk.
1. Select a file system for the installation partition. After you create the partition on which you will install Windows Server 2003, you can use Setup to select the file system with which to format the partition. Windows Server 2003 supports the NTFS file system in addition to the file allocation table (FAT) and FAT32 file systems. Windows Server 2003, Windows XP Professional, Windows 2000, and Windows NT are the only Microsoft operating systems that you can use to gain access to data on a local hard disk that is formatted with NTFS. If you plan to gain access to files that are on a local Windows Server 2003 partition with the Microsoft Windows 95 or Windows 98 operating systems, you should format the partition with a FAT or FAT32 file system. We will use NTFS.


2. Setup will then begin copying necessary files from the installation point (CD, local I386 or network share).
3. Note: If you began the installation process from an MS-DOS floppy, make sure you have and run SMARTDRV from the floppy, otherwise the copying process will probably last more than an hour, perhaps even more. With SMARTDRV (or if setup was run by booting from CD) the copying will probably last a few minutes, no more than 5 max.


3. The computer will restart in graphical mode, and the installation will continue.

Next Step : The GUI-based portion of the Setup program
The setup process reboots and loads a GUI mode phase.


It will then begin to load device drivers based upon what it finds on your computer. You don't need to do anything at this stage.

1. Click Customize to change regional settings, if necessary.
* Current System Locale - Affects how programs display dates, times, currency, and numbers. Choose the locale that matches your location, for example, French (Canada).
* Current Keyboard Layout - Accommodates the special characters and symbols used in different languages. Your keyboard layout determines which characters appear when you press keys on the keyboard.
If you don't need to make any changes just press Next.

If you do need to make changes press Customize and add your System Locale etc.
Note for Hebrew users: Unlike W2K, it is SAFE and it is OK for you to install Hebrew language support at this phase.
To install Hebrew support:
After pressing Customize go to the Languages tab and select the "Install files for complex script and right-to-left languages".
A warning message will appear. Press Ok.


Warning: You must now press Apply!!!
Setup will copy the necessary files from the installation point.
You can now go to the Regional Options tab and select Israel in the Location drop-down list, and Hebrew in the Standards and Formats drop-down list. Click Ok.


Note: Read the Install Hebrew on Windows Server 2003 page for more info.
1. Type your name and organization.

2. Type the product key.

3. Enter the appropriate license type and number of purchased licenses.

4. Type the computer name and a password for the local Administrator account. The local Administrator account resides in the SAM of the computer, not in Active Directory. If you will be installing in a domain, you need either a pre-assigned computer name for which a domain account has been created, or the right to create a computer account within the domain.

5. If you enter a password that is blank or does not match the required complexity settings you will get a warning message.

6. Select the date, time, and time zone settings.

7. Setup will now install the networking components.


After a few seconds you will receive the Networking Settings window. BTW, if you have a NIC that is not in the HCL (see the What's the HCL? page) and Windows Server 2003 cannot detect it, or if you don't have a NIC at all, setup will skip this step and you will immediately go to the final phase of the setup process.
Press Next to accept the Typical settings option if you have one of the following situations:
* You have a functional DHCP on your network.
* You have a computer running Internet Connection Sharing (ICS).
* You're in a workgroup environment and do not plan to have any other servers or Active Directory at all, and all other workgroup members are configured in the same manner.
Otherwise select Custom Settings and press Next to customize your network settings.

Highlight the TCP/IP selection and press Properties.

In the General tab enter the required information. You must specify the IP address of the computer, and if you don't know what the Subnet Mask entry should be - you can simply place your mouse pointer over the empty area in the Subnet Mask box and click it. The OS will automatically select the value it thinks is good for the IP address you provided.

If you don't know what these values mean, or if you don't know what to write in them, press cancel and select the Typical Settings option. You can easily change these values later.
1. In the Workgroup or Domain window enter the name of your workgroup or domain.
* A workgroup is a small group of computers on a network that enables users to work together and does not support centralized administration.
* A domain is a logical grouping of computers on a network that has a central security database for storing security information. Centralized security and administration are important for computers in a domain because they enable an administrator to easily manage computers that are geographically distant from each other. A domain is administered as a unit with common rules and procedures. Each domain has a unique name, and each computer within a domain has a unique name.
If you're a stand-alone computer, or if you don't know what to enter, or if you don't have the sufficient rights to join a domain - leave the default entry selected and press Next.

If you want to join a domain (NT 4.0 domain of W2K/2003 Active Directory domain) enter the domain's name in the "Yes, make this computer a member of the following domain" box.

To successfully join a domain you need the following:
* The person performing the installation must have a user account in Active Directory. This account does not need to be the domain Administrator account.
and
* The computer must have an existing computer account in the Active Directory database of the domain that the computer is joining, and the computer must be named exactly as its domain account is named.
or
* The person performing the installation must have appropriate permission to create a domain account for the computer during installation.
Also, you need to have connectivity to the domain's domain controllers (only to the PDC if on an NT 4.0 domain) and a fully functional DNS server (only in AD domains). Read the Joining a Domain in Windows XP Pro and Requirements when Joining a Domain pages for more on this issue.
Enter the Active Directory domain name (in the form of xxx.yyy, for example: DPETRI.NET) or the NetBIOS name of the NT 4.0 domain (in the form of xxx, for example: DPETRI). Press Next.
Note: If you provide a wrong domain name or do not have the correct connectivity to the domain's DNS server you will get an error message.
A username/password window will appear. Enter the name and password of the domain's administrator (or your own if you're the administrator on the target domain).

Note: Providing a wrong username or password will cause this phase to fail.
1. Next the setup process will finish copying files and configuring the setup. You do not need to do anything.


2. After the copying and configuring phase is finished, if Windows Server 2003 finds that you have a badly configured screen resolution it will advise you to change it and ask you if you see the new settings right.
BTW, the minimum supported screen resolution in 2003 is 800X600.
3. Setup finishes and boots Windows Server 2003.


4. That's it! you're done!

Subscribe to:
Posts (Atom)